Pages

Wednesday, 21 April 2010

Death - Biped

The first thing I wanted to do was to hollow out the sleeves so the wrists of my hand models would look better disappearing inside the cloak. I used the same method as I did with the hood but this time I had problems with the Smooth modifier! For some reason the Turbo Smooth and Smooth modifiers had issues with me cutting the model like this so I left it how it was as hoping that it wouldn't notice.


I then created I biped for death which fitted the size of the cloak.


The hands and skull were attached to the biped using the skin modifier separately and then I added a skin modifier to the cloak. The main purpose was to get the arms and hands working properly because Death wasn't going to walk anywhere in my scene but he may move his arms.

This is the final model of my Death character. With working arms and head.


Death - Hand


I stated with a picture of the outline of a skeletons hand and then created Planes which roughly fitted over each bone. I then used the select and move tool to shape the bones. Once the model was made I used the extrude tool to give the hand depth. Lastly I added a Turbo smooth and the same materials to the hand as i did to the skull to make it look more realistic.


The hand turned out quite good, all I will need to do is to duplicate it for the opposite arm and there done!

Death - Skull & Cloak


To hollow out the hood for deaths cloak I used the cut tool to make a new edge around the hood parameter then I selected the inner polygons and then deleted them.


I then added my skull to see how it looked. There was a slight problem with hood now which had arisen since I had made the change. The problem was that the turbo smooth modifier was effecting the neck part of the cloak, it rose up a bit and wasn't quite right. I tried to move some 'verts' to correct it but it didn't seem possible.


I decided to take the Turbo Smooth away and add just the Smooth modifier which made the problem go away but i had a dilemma because the Turbo Smooth makes the hood look more natural.


This is the cloak with the Smooth on is looks o.k because the cloak doesn't have to look totally realistic because of the cartoon style. I also added a fabric bump map to the cloak and a dark grey colour. I didn't want to make the cloak too dark because I wanted it to stand out a bit in my scene.


Death - Skull

The skull was modeled from this cartoon picture. I started with a box then using the editable poly modifier I deleted some polygons so get a basic shape of the skull next I moved the 'verts' to shape the head. I then used the 'verts' to shape the eyes and nose, next I deleted the polygons to make these features hollow.


Once I had sculpted the skull I chose the side of the head that looked best and then deleted half of the skull so I could use the symmetry modifier to make the skull symmetrical. The teeth were made by using the cut tool and deleting the triangular shapes out of the jaw. The Skull would be buried inside the hood of the cloak so I didn't have to worry about the back of the head. I also left the skull face flat which wouldn't matter because the scene will only Death from the front.


To finish the skull I found a bone texture and used it in the diffuse and bump maps in the material editor. I also pushed the self illumination up to give the skull a ghostly glow in the dark look. Overall I think it came out quite well and should look effective in the darkly lit scene.


Death - Cloak


I now needed the make my Death character. I started by using my original sketches that I drew at the start of the project. Firstly I placed the pictures on to two planes and froze them so that you could see both angles of the character next to each other. I started with a box which covered the torso of the character and then changed it to an editable poly. Here I moved the vertices so that they matched the outline of my drawing.


I found out while making the Old man character that you only have to concentrate on one side of the model so I did this with the side of death with his arm sticking out.

In my initial drawing I didn't put any detail in deaths face because I wanted him to look quite menacing but I was thinking to animate the death talking if i had time so i needed him to have a mouth. I looked for an appropriate skull on the web and found a cartoon skull that would probably work well because it fitted well on to my cloak and also look quite evil, but fun! I created a new plane and added the skull to it, this was to get the shape of the hood right.


To finish the cloak I added a symmetry modifier and then finally a turbo smooth modifier. I would now have to think about hollowing out the hood and the sleeves.


Scene Two - Part 2

The scene now needed the rain effect which matched the same direction and strength as the first scene.
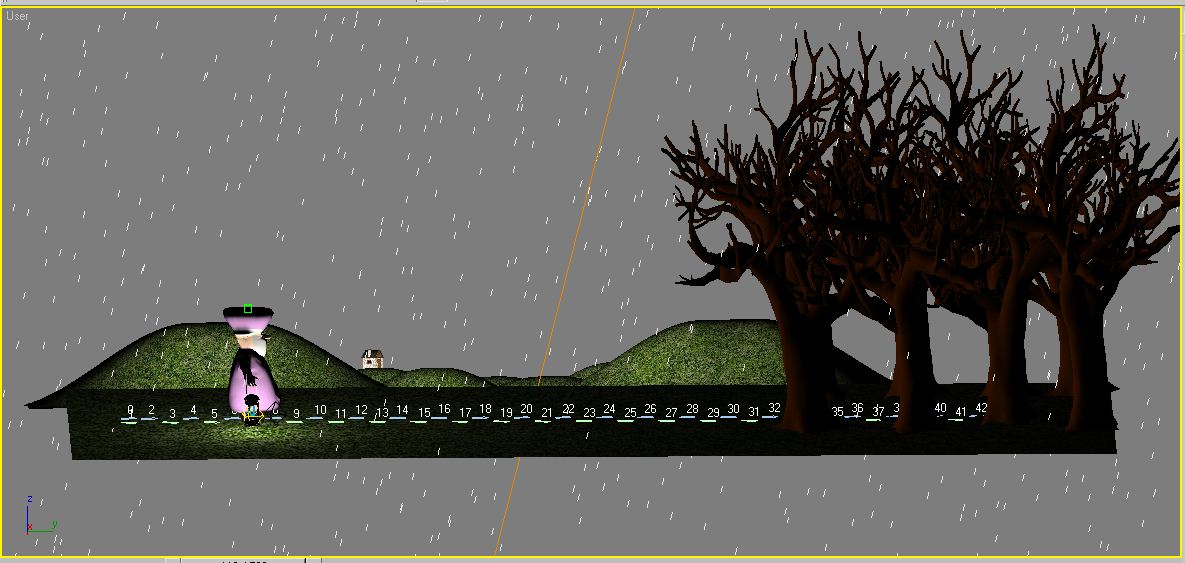
Looking back at my original story board I noticed that the trees were allot bigger so I re-sized them and then moved the camera in slightly.


Finally I added the Oldman with the lamp and gave him his footsteps to take him into the woods. I used the same techniques from scene one to add the lightning and moon light effects and also the rain and thunder effects, but this time I added a few more sounds that I had found from the web. I wanted the Oldman to disappear in to the woods and all you would here was him sawing and chopping away. This would give the viewer the impression of him working away in the woods without actually showing it. I did this by adding a few samples to the rain and thunder wav file using Adobe Soundproof.


Scene Two - Part 1

This scene takes the Oldman character into the woods where he needs to collect wood for the fire. The feel of the scene will look allot like the first scene. I started by using the hills and house from scene one and putting them in the back ground, from here I started to duplicate and re-size the hills to form a landscape. The problem I was having was that I wanted there the be a perspective look to the landscape, so there were larger hills closer to the camera and smaller ones further away. So I scraped my first attempt and then added two bigger hills either side of the scene.

I also had issues with what view in Max to film my sequence in. The perspective view made the house in the background look to far away but the user view looked closer and better. Another issue was that I didn't want the foreground to look to flat so I made two parts of the scene. Background, and a foreground that slopped towards the camera a bit. I also added some 3ds trees to the right of the scene with a bigger enough gap for the Old man to walk through.

I finally stuck with this layout. The house is in the distance but clear the big hills give the scene perspective, the two parts look like they join seamlessly.

Tuesday, 20 April 2010

Scene One - Light & Sound

I was happy with the Old mans walk because it gave the scene a sense of distance and comedy as he slowly disappeared from one hill and re-appeared over the next. The scene now needed some light effects. The first light I would need is the light coming from the fire in the house. The light would need to fade away as if the fire wood runs out.

My original idea was to put a flickering omni light directly inside the house by changing the noise levels, this i thought would look more like a flame and the light would only escape through the window, but this didn't end up looking very good. Firstly I couldn't get the flicker to light up just the inside of the house and secondly the flicker was too extreme. I needed more of a glow so I put an omni light just inside the window and gave it an orange tint. I also Checked the 'Far Attenuation Use box' so that the light was only concentrated around the the window area. Next I used the Auto key and raised the multiplier up and down to give a glowing fire effect. This was simple but it looked far more effective than the flicker.

Next I wanted to add lightning to my scene this would be done by first looking for a thunder and rain sound effect. While going through some samples on the web I found a nice clear thunder sound and a good rain effect. I wanted to loop the thunder and also match the volumes of the samples so I opened up Adobe Soundproof and produced one wav file which would act are my weather sound effects if all of my scenes.


Once I had loaded the file into the Curve editor I could start to add my lightning. First I added a omni light in the sky above the scene and set the multiplier to zero. Next I ran my animation and watched when the waves on the track editor got larger, this would tell me the best frame for me to give a burst of light from the omni using the auto key and the multiplier. I wanted to make the lightning and thunder to look as violent as possible so it would look like the Old man is haven't to go out in the worst weather ever!


Lastly I imported my lamp model and linked it the mans hand so it followed him across the scene. The lamp also had the noise flicker effect but which the introduction of the lightning the scene was to busy with flashing lights so I decided to stick to a simple white light which showed the off the movement of the Old mans body better. I also animated the the door opening, this was easily done because i used a pivot door when making the house model. One problem I had with my lamp is that the super gizmo with the fire effect had disappeared and I'm not to sure why or how to get it back. I tried re-setting it with higher setting but it still didn't show up??


Scene One - Footsteps

Once i had the hills looking right I started on the footsteps for my Old man character. I reverted back to my original story board and positioned the old man at the point where the house was going to be, because the man was going to start from inside the house and walk down the hill and disappear out the bottom of the screen. In footstep mode I created enough footsteps to cover the ground over the hill. I needed to rotate the steps so the feet angled down the hill and I also had to to position them so they were touching the grass.

Next I looked to see how the Old man looked while walking down the hill. First I had the problem of his arms staying by his side, this looked very odd as the character was fat and I wanted his arms to stick out as if he was always keeping balance whilst he was walking. I also had to rotate all the footsteps so they were facing outwards a bit, this what make the Old man look like he was shuffling along and also this stopped my models ankles from 'twisting up' because the Oldmans feet were designed to stick awards a bit.


I needed to work out the timing of the Oldman exit and re-entrance to the scene next. The Old man would leave the scene by walking down the first hill and then re-appear walking in the distance over the second hill. I decided to extend the footsteps out of the bottom of the hill so he was out of sight and it acted as a good time gauge to when he should re-enter again.


Once I knew what frame to use I created another copy of the Old man and then repeated what I did to to the first hill but this time he would be climbing the hill.


Wednesday, 7 April 2010

Old Man - Biped

Now my model was finished I needed to add the biped, this was something I had no experienced in doing and I didn't now how it would interact with my character. I modified the size of each bone so it fit the cartoon body of the Old man.

As my character was much fatter than than the standard biped shape I need to make the bones as wide as possible.

Next I had to weight the hands, eyes, browse and mouth to the biped. Here I selected each object and added a skin modifier. Next I would need to add the modifier to the body and to see what happened when the limbs moved.


Old Man - Model Finish

The main features of the face were next and I made the eyes using two spheres for the eye ball and a separate half sphere for the eye lid, I kept the eye lids so they can be opened and shut for when I do the close up scene of his face. Next I created three simple objects for the eye browse and the mouth.


Ive kept the mouth simple and black because I wanted it to stand out as much as possible in the Forrest scene. The mouth will not open as such but it will change shape when the character talks.


Overall I'm quite happy the way it has turned out because it didn't look good at first. I had quite a few issues with the maps not looking good in certain positions but hopefully these wont show up in the animation.

Old Man - Face

To give the Old man a bit of life and colour I selected the poly's that made up the beard and then added a bump and colour to it with the material editor. It also needed a map modifier so that the beard wrapped around his face properly. I did the same with the skin and I also added colour the his hat and tunic. But I still wasn't happy with his nose and eye sockets and I also needed to give him some ears.

The problem I was having was that if I was changing one side of his face it was virtually imposable to get the other side the same. So I had to delete half of my model and then add a symmetry modifier (which I hadn't used before). At first it looked very strange but I could now get to work on shaping the features.
I extruded the ear and started to reshape the nose but the problem I was having was that I had created to many vertices's when I extruded the nose and cheeks from the original box. This made it really hard to choose the right vertices's to adjust to get the face right.

Old Man - Body


To make the model of the Old man I used my original sketches for the character I drew at the start of the project. I set the two views of the Old man up on planes and then froze them so they didn't bother my while I will building him.


I then made a box object to make up the main bulk of the torso. I shaped the body so he would have a nice fat shape an then I extruded the arms.


The ankles and feet were next. I wanted to add the hands now, this was to give the Old man a bit of life while I was modeling him.


The head and hat were extruded next. Here it was becoming apparent that my sketches weren't quite good enough to use for referencing. Firstly the arms were down by the side in the sketch. This wasn't easy to model and also there may of been issues with the side of the body stretching when the arms went up. Secondly the sketch wasn't drawn straight and symmetrical so it was was hard to keep the model neat.


It was too late to start again so I tried my best to get the model as true to the sketches as possible. Next time I would turn my original sketches into a more technical drawing where all the measurements were perfect and the arms were at an upright position. After rendering the model I realised that it needed allot more work to get it looking how I wanted I to.

Old Man - Hands

I needed to make some hands for the Old man. I have decided not to make them too detailed i.e add finger nails, as this would be too time consuming and the final animation will not have any close ups of the them.


First I created a box and made it 7 segments for the width and 3 segments for the length and 1 for the height. I then shaped one end inwards for the wrist and one in outwards for the fingers.


Next I selected 4 polygons at end of the box and used the 'extrude' to bring the fingers out making sure I stopped at the each put of the knuckle to add new segments to the fingers.


At this point I needed a reference to copy round so I found a picture of a hand and added it to plane and placed it directly behind the object.

Once the fingers wee complete I concentrated on the thumb which I extruded from the side of the hand and shaped it the best I could around the Reference map.

Finally I added some knuckles to the hand this was done selecting the Polygons where the knuckles should be and exuding and then scaling them to a realistic size.